Fringe projection based three-dimensional measurement system by the light-source-stepping method using LD
-
摘要:
在采用LED的光源步进法三维测量系统中,由于LED发散角大,在短距离内就达到较大的条纹投影面积,造成系统工作距离短。另外大功率LED发光面尺寸大导致条纹对比度低,投影高亮度、高对比度的条纹困难。为解决上述问题,提出在光源步进法投影装置中采用激光二极管(LD)作为光源,实现高亮度、高对比度相移条纹投影。采用该投影装置与双目摄像机设计了便携、高速的三维测量系统。首先利用改进的傅里叶变换轮廓术获取变形条纹相位及调制强度;接着利用激光散斑的随机性,在调制强度图中实现双目图像的粗匹配;然后在粗匹配的基础上进行条纹相位展开,利用相位实现精匹配;最后获得待测物体三维形貌。利用设计的系统进行了实验验证。系统的测量体积为360 mm×290 mm×100 mm,采集的三维数据最多为1280×1024点。实现了100 f/s的三维形貌测量速度,对平面的测量标准偏差为0.19 mm,对5个间隔距离为1.00 mm的平面进行了测量,测量距离的平均误差为0.05 mm。
Abstract:In the three-dimensional (3D) measurement system by the light-source-stepping method using LED, due to the large divergence angle of LED, the large fringe projection area can be achieved in a short distance, resulting in a short working distance of the system. In addition, the large luminous size of high-power LED leads to low fringe contrast, and it is difficult to project fringes with high brightness and high contrast. To solve the above problems, it is proposed to use laser diode (LD) as the light source to realize high brightness and high contrast phase-shift fringe projection in the light-source-stepping projection device. A portable and high-speed three-dimensional measurement system is designed by using the projection device and binocular camera. Firstly, an improved Fourier transform profilometry is used to obtain the phase and modulation of deformed fringe. Secondly, using the randomness of laser speckle, the rough matching of the binocular image is realized in the modulation map. Then, the fringe phase is unwrapped on the basis of rough matching, and the phase is used to realize fine matching. Finally, the three-dimensional shape of the object to be measured is obtained. The experimental verification is carried out by using the designed system. The measurement volume of the system is 360 mm×290 mm×100 mm, and the maximum 3D point captured is 1280×1024 points. The 3D shape measurement speed of 100 f/s was achieved. The measurement standard deviation of the plane is 0.19 mm. Five planes with a distance of 1.00 mm were measured, and the average error of the measurement distance is 0.05 mm.
-
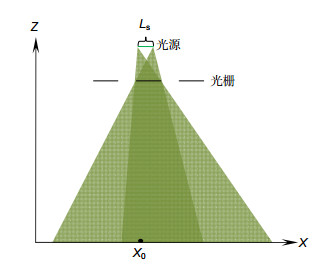
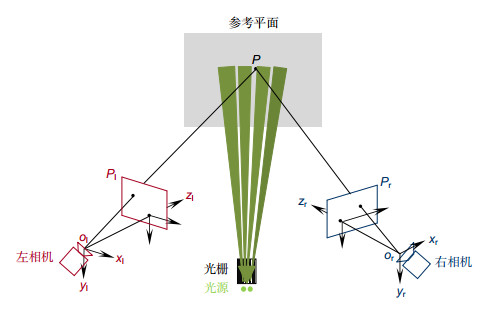
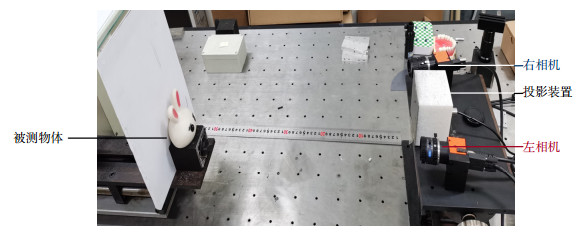
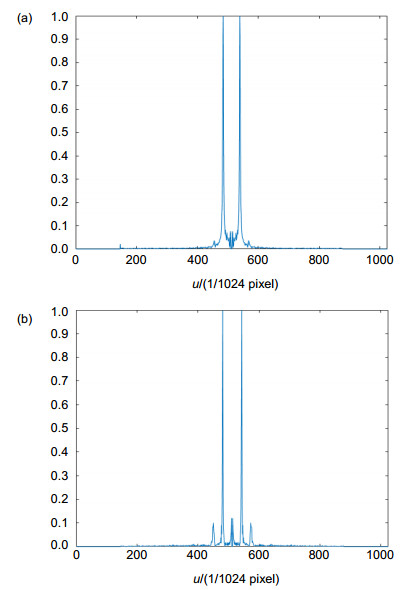
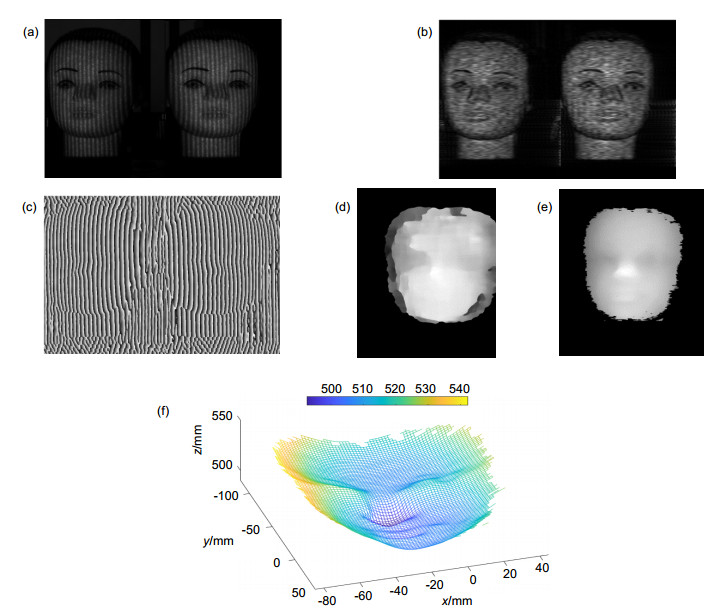
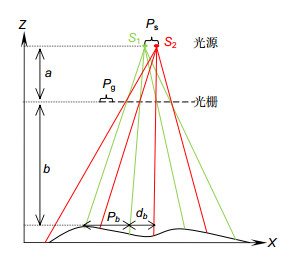
Overview: Fringe projection based three-dimensional measurement technology has been widely used in reverse engineering, cultural relic protection, medical image, virtual reality, and so on. The fringe projection device (projector) is an essential part of the measurement system based on this technology. The common high-speed projector is expensive and complicated. Fujigaki proposed a light-source-stepping projector using a linear LED array and Ronchi grating. The projector is simple, smaller in size, and cheaper in price. However, a large light-emitting area of high-power LED leads to lower contrast of the fringe, especially the high-density fringe. The large divergence angle of LED leads to the short working distance of the projector. On other hand, the light-emitting area and divergence angle of laser diode (LD) are small. To solve the problems of LED-based projectors, a linear LD array is used as the light source to project phase-shifted fringe with higher brightness and higher contrast. Because LD is a coherent light source, a speckle problem is introduced while improving fringe contrast. Using the randomness of speckle, the speckle in the modulation image is used as a feature for rough matching of homologous points in a binocular system. In the origin system, PMP is used for phase measurement. The measured depth range of the system is small because the phase shift is different at different depths. An improved Fourier transform profilometry is proposed to extend the depth range. A portable and high-speed three-dimensional measurement system is designed by using the projector and binocular camera. The measurement process is as follows. 1) The light-source-stepping method is used to project phase-shifted fringes and the camera is used to take deformation fringes. 2) The two deformed fringe patterns with phase shift are subtracted. Then, Fourier transform, filtering, and inverse Fourier transform are performed successively. Finally, the wrapped phase and modulation are obtained. 3) The modulation image is segmented, and then the homologous points are found by feature matching in the neighborhood near the point with the highest modulation in each non-connected region. 4) The matching points with high reliability are selected, and the phase is unwrapped by using the reliability-guided fast phase unwrapping algorithm. 5) Using the unwrapped phase for fine matching, a high-precision parallax map is obtained. 6) The three-dimensional shape is reconstructed using the parallax. The experimental verification is carried out. The measurement volume of the system is 360 mm×290 mm×100 mm, and the maximum 3D point captured is 1280×1024 points. The 3D shape measurement speed of 100 f/s was achieved. The measurement standard deviation of the plane is 0.19 mm. Five planes with a distance of 1.00 mm are measured, and the average error of the measurement distance is 0.05 mm.
-

-
表 1 平面移动距离测量结果
Table 1. Measurement results of plan distance
实际距离/mm 测量结果/mm 1.00 1.10 1.00 0.90 1.00 1.00 1.00 1.00 -
[1] Gen J. Structured-light 3D surface imaging: a tutorial[J]. Adv Opt Photon, 2011, 3(2): 128–160. doi: 10.1364/AOP.3.000128
[2] 苏显渝, 张启灿, 陈文静. 结构光三维成像技术[J]. 中国激光, 2014, 41(2): 0209001. https://www.cnki.com.cn/Article/CJFDTOTAL-JJZZ201402002.htm
Su X Y, Zhang Q C, Chen W J. Three-dimensional imaging based on structured illumination[J]. Chin J Lasers, 2014, 41(2): 0209001. https://www.cnki.com.cn/Article/CJFDTOTAL-JJZZ201402002.htm
[3] 李勇, 张广汇, 马利红, 等. 条纹投影动态三维表面成像技术综述[J]. 红外与激光工程, 2020, 49(3): 0303005. https://www.cnki.com.cn/Article/CJFDTOTAL-HWYJ202003006.htm
Li Y, Zhang G H, Ma L H, et al. Review of dynamic three-dimensional surface imaging based on fringe projection[J]. Infrared Laser Eng, 2020, 49(3): 0303005. https://www.cnki.com.cn/Article/CJFDTOTAL-HWYJ202003006.htm
[4] Srinivasan V, Liu H C, Halioua M. Automated phase-measuring profilometry of 3-D diffuse objects[J]. Appl Opt, 1984, 23(18): 3105–3108. doi: 10.1364/AO.23.003105
[5] Guan Y J, Yin Y K, Li A M, et al. Dynamic 3D imaging based on acousto-optic heterodyne fringe interferometry[J]. Opt Lett, 2014, 39(12): 3678–3681. doi: 10.1364/OL.39.003678
[6] Xian T, Su X Y. Area modulation grating for sinusoidal structure illumination on phase-measuring profilometry[J]. Appl Opt, 2001, 40(8): 1201–1206. doi: 10.1364/AO.40.001201
[7] Heist S, Mann A, Kühmstedt P, et al. Array projection of aperiodic sinusoidal fringes for high-speed three-dimensional shape measurement[J]. Opt Eng, 2014, 53(11): 112208. doi: 10.1117/1.OE.53.11.112208
[8] Hyun J S, Chiu G T C, Zhang S. High-speed and high-accuracy 3D surface measurement using a mechanical projector[J]. Opt Express, 2018, 26(2): 1474–1487. doi: 10.1364/OE.26.001474
[9] 张海花, 李勇, 张启灿. 基于旋转光栅投影的动态三维面形测量方法[J]. 光学学报, 2021, 41(23): 2312005. https://www.cnki.com.cn/Article/CJFDTOTAL-GXXB202123017.htm
Zhang H H, Li Y, Zhang Q C. Dynamic 3D shape measurement method based on rotating grating projection[J]. Acta Opt Sin, 2021, 41(23): 2312005. https://www.cnki.com.cn/Article/CJFDTOTAL-GXXB202123017.htm
[10] Li Y, Zhao C F, Qian Y X, et al. High-speed and dense three-dimensional surface acquisition using defocused binary patterns for spatially isolated objects[J]. Opt Express, 2010, 18(21): 21628–21635. doi: 10.1364/OE.18.021628
[11] 邢生平, 蔡宁, 林斌. 基于蚁群相位抖动优化的高质量三维形貌测量[J]. 光电工程, 2021, 48(7): 210114. doi: 10.12086/oee.2021.210114
Xing S P, Cai N, Lin B. High-quality 3D shape measurement based on ant colony phase jitter optimization[J]. Opto-Electron Eng, 2021, 48(7): 210114. doi: 10.12086/oee.2021.210114
[12] 卢世江, 李勇, 王辉, 等. 含孤立物体场景的高速、高密度三维面形采集[J]. 光电工程, 2012, 39(1): 34–39. doi: 10.3969/j.issn.1003-501X.2012.01.007
Lu S J, Li Y, Wang H, et al. High-speed and dense 3D shape capture of scene consisting of spatially isolated objects[J]. Opto-Electron Eng, 2012, 39(1): 34–39. doi: 10.3969/j.issn.1003-501X.2012.01.007
[13] Zhang S. High-speed 3D shape measurement with structured light methods: a review[J]. Opt Lasers Eng, 2018, 106: 119–131. http://www.sciencedirect.com/science?_ob=ShoppingCartURL&_method=add&_eid=1-s2.0-S0143816617313246&originContentFamily=serial&_origin=article&_ts=1521473977&md5=8c9f34bcc942036d329f977c82aeef9b
[14] 冯晨, 陈文艺, 杨辉. 基于MEMS微振镜的高精度正弦光栅产生方法[J]. 计算机与数字工程, 2018, 46(2): 367–370, 401. doi: 10.3969/j.issn.1672-9722.2018.02.031
Feng C, Chen W Y, Yang H. A generation method of high accuracy sinusoidal grating based on MEMS micro-mirror[J]. Comput Digit Eng, 2018, 46(2): 367–370, 401. doi: 10.3969/j.issn.1672-9722.2018.02.031
[15] Fujigaki M, Oura Y, Asai D, et al. High-speed height measurement by a light-source-stepping method using a linear LED array[J]. Opt Express, 2013, 21(20): 23169–23180. doi: 10.1364/OE.21.023169
[16] Fujigaki M, Sakaguchi T, Murata Y. Development of a compact 3D shape measurement unit using the light-source-stepping method[J]. Opt Lasers Eng, 2016, 85: 9–17. doi: 10.1016/j.optlaseng.2016.04.016
[17] Jiang Y T, Li Y, Huang K, et al. New calibration approach for 3D measurement system based on the light-source-stepping method[J]. Proc SPIE, 2019, 11189: 111891J. http://www.researchgate.net/publication/337361460_New_calibration_approach_for_3D_measurement_system_based_on_the_light-source-stepping_method
[18] 李勇, 苏显渝. 用于可靠性导向相位展开的快速算法[J]. 光电工程, 2005, 32(11): 76–79. doi: 10.3969/j.issn.1003-501X.2005.11.019
Li Y, Su X Y. Fast algorithm for reliability-guided phase unwrapping[J]. Opto-Electron Eng, 2005, 32(11): 76–79. doi: 10.3969/j.issn.1003-501X.2005.11.019
-


 E-mail Alert
 RSS
RSS
 下载:
下载:
