College of Veterinary Medicine, The University of Tennessee, Knoxville, Tennessee, USA.
Specimen preparation is a very important step of the silicone plastination process, especially when using fresh tissue. If you plastinate specimens that have been poorly or inadequately prepared, the final product will be inferior no matter how well the specimen is impregnated with silicone. Minimal fixation may help assure a more natural looking specimen. Care must be taken to keep the specimen in its normal anatomical position. Loose portions of the specimen may be held in position with suture. Intravascular injection of colored silicone, gelatin, latex or epoxy may be used to highlight vessels. Hollow organs need to be flushed, cleaned, dilated and then fixed in a dilated position. Dilation of hollow organs will increase the flexibility of that organ by overcoming rigor. Intestinal specimens may be opened to remove ingest, sutured closed and then dilated. Ostia with strong sphincters must be held open with appropriate sized cannulas or tubing. All cut vessels of heart preparations must be closed by ligatures or inverted corks ligated in place, except for one vena cava and one pulmonary vein. These will have tubing ligated in place and used for dilating each side of the heart. The atrioventricular valves of the heart can be accentuated by holding them away from the chamber wall and semilunar valves enhanced by dilating with cotton or other packing materials. Joint capsules, distended and fixed with 20% formalin, aid in studying the internal anatomy of the joint. Plan the theme of the specimen and limit the focus of the specimen to fewer items especially musculoskeletal preparations. Holes drilled into the marrow cavity of long bones in less noticeable areas enhance defatting and prevent sticky/greasy specimens years later. Old long-term fixed brains whose white/gray differentiation has faded may be rejuvenated and made more useful by sectioning or prosecting and staining to highlight the gray matter. Specimens may be plastinated following histochemical studies for long term review or study. A pink color may be added to the surface of the specimen using Biodur stain in the last acetone bath. Dilation of hollow organs must occur during the curing process. Beautiful specimens do not just happen.
Biological Specimens, Preservation, Plastination, Specimen Preservation
Dr. R. W. Henry, College of Veterinary Medicine, The University of Tennessee, 2407 River Drive UT/CVM, Knoxville, Tennessee, 37996-4500, USA. Telephone: 423 974 5822 / Fax: 423 974 8222. Email: RHenry@UTK.EDU

![]()


When preserving biological specimens by any method, specimen preparation has always been a very important part of the preservation process. This is still the case when producing specimens to be preserved by the silicone plastination process, especially when using fresh tissue. If you plastinate specimens that have been poorly or inadequately prepared, the final product will be inferior no matter how well the specimen is impregnated with silicone.
Specimens may be fixed prior to or after prosection. However, to minimize exposure to formalin vapors and to assure final specimen shape and desired position, fixation after prosection is desirable. A1-10 % formaldehyde solution may be used, as well as, other fixatives of your choice. Lower percentage formalin solutions may produce less bleaching of the specimen. However brains need to be fixed with a high (10-20) percent formalin for several months to prevent shrinkage during impregnation. Fixation is not al- ways necessary for S10 plastination (von Hagens, 1985; Holladay, 1989). If tissue is not fixed, it may aid in preserving some of the natural specimen color. However, dehydration bleaches the specimen. Minimal fixation (low percent- age and short time, 1-2 days) will yield a specimen which is more flexible and more natural looking. Fixation of hollow organs is necessary to maintain the shape and lumen of the organ (figure 1). Logically, it is beneficial to keep the specimen in its normal anatomical position during fixation and the first dehydration bath.
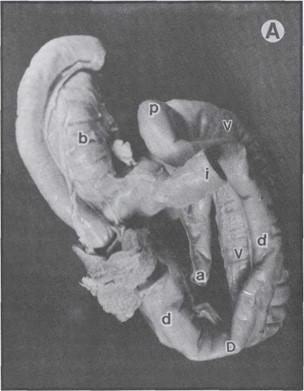 Figure 1a. Plastinated large intestines (ascending colon and cecum) from an equine foal (dorsal view). Dilation was carried out prior to and during fixation, as well as during curing. Note the relative normal anatomical appearance, a - apex of cecum, b - base of cecum, d - Dorsal colon, D - diaphragmatic flexure, i - ileum, p - pelvic flexure, V - ventral colon. |
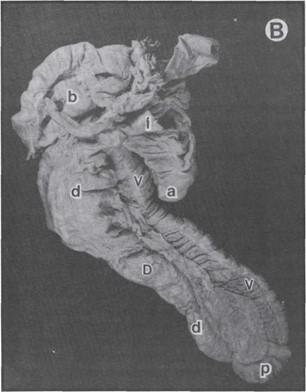 Figure 1b. Plastinated large intestines (ascending colon and cecum) from an equine foal (dorsal view). No dilation prior to or during fixation or during curing was per- formed, a - apex of cecum, b - base of cecum, d - Dorsal colon, D - diaphragmatic flexure, i - ileum, p - pelvic flexure, V - ventral colon. |
Intravascular injection
Intravascular injection of silicone, gelatin, latex or epoxy may be used to highlight the vessels (Tiedemann, 1982; von Hagens, 1985; Oostrom, 1987; Oostrom and von Hagens, 1988; Riepertinger and Heuckendorf, 1993; Grondin and Olry, 1996). There are advantages for each of the above. Epoxy will fill even the smallest vessels; how- ever it is brittle and will fracture when bent. To dilute the somewhat viscous epoxy mix and to extend its working time, up to 40% methyl ethyl ketone or acetone may be added. Where as, the others products remain flexible but may not reach the capillary bed. Occasionally, latex may remain tacky after impregnation. It should not be used with methylene chloride as it will swell up 2-3 times its volume and disrupt the surrounding architecture. To prevent E12 softening, E12 injected specimens should not be left in methylene chloride for more than a few hours of degreasing. By the addition of 0.3% each of two additional hardeners (S6 and S2), silicone mix (S10/S3) from your plastination kettle can be used to inject vessels. As well, 0.5% to 1% S2 alone or 3% SI alone may be added to the S10/ S3 mix and used for injection.
Dilation of hollow organs
In order to assure an adequate sized lumen, as well as proper shape, it is preferable to dilate all hollow organs. Dilation has to occur prior to fixation and needs to be maintained throughout the period of fixation. However, over dilation may distort the specimen as much as no dilation.
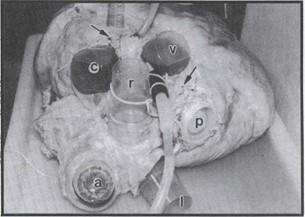
Figure 2. Preparation for plastination of a heart from a mature white rhinoceros. The heart had been lacerated both externally and internally and the great vessels had been cut extremely short. Defects were sutured (arrows). Since ves- sels were much larger than our largest corks and many ves- sels had been destroyed or cut too close to the heart, vessels were occluded using inverted laboratory cups and a barrel cap (bung), a - aortic arch, c - cranial vena cava, 1 - left pulmonary artery, r - right pulmonary artery, v - caudal vena cava, p - hole in the dorsum of left atrium where pulmonary veins had been cut and torn off. Large tube is in a pulmonary vein. Small tube is through a laceration of the right atrium.
Hearts:
Several methods on dilation of the heart (Tiedemann and von Hagens, 1982; Henry, 1987; and Oostrom, 1987) have been described. To dilate the heart, it is necessary to close all cut vessels. However, an inflow to each side of the heart is required so that both sides of the heart can be dilated (figure 2). Obviously because of its comparatively thin wall, the right side of the heart requires less time and pressure to dilate than the left side does. Usually a dog or hu- man heart takes 2-3 days to dilate the left ventricle. Key points are to cut the vessels of adequate length when the heart is removed. It is often easier to ligate and/or insert corks and tubing as the vessels of the heart are cut during removal. Blood and clots should be flushed from the heart prior to placement of the last cork into each side of the heart. If the vessels have been cut too short, there are ways to salvage the specimen (figure 2), but it may be difficult. The vessel may be sutured closed or if a vessel is too large, a cork or other round object can be sutured inside the vessel to occlude it. Even if the heart cannot be totally sealed, some degree of dilation may be accomplished. An important anatomical variation between animal and human hearts is while the human heart may only have 2 or 3 pulmonary veins to occlude, animals often have 4 to 6. Initially the heart may be gently dilated with tap water. A reservoir is preferable over hooking directly to the tap, as tap pressure may fluctuate to an ineffective low or dangerously high level. Neither of which is desirable and may damage the specimen. Once rigor has been overcome with hydrostatic pressure, the heart is ready for color injection followed by fixation under pressure. A recirculation pump is useful to return fixative back to the reservoir especially if' you are doing several specimens or if you have a leaky heart. Fixation by dilation should proceed for 1-5 days depending on the size of the heart. For example a human or dog heart is usually ready after 2 days. The atrioventricular (av) and semilunar (aortic or pulmonic) valves of the heart can be accentuated by holding them away from the chamber wall and dilating with cotton or other packing materials (Baptista and Conran, 1989) prior to fixation. However, the best time to expand and/or high- light valves is often after impregnation and during the curing process. At this time the aortic and pulmonic valves can be rounded to their closed state by placing small "balls" made from paper towels in their concave surface. Av valves can be elevated away from the ventricular wall at the beginning of curing, by placing strips of paper towels between the ventricular wall and the av valve if windows have been cut to view the interior of the ventricles.
Occasionally, a prize or rare specimen may get damaged during initial specimen collection or preparation and the specimen cannot seemingly be dilated. However, a tear can be repaired by suturing or occluded using digital pressure until dilation or partial dilation is accomplished. Any number of items found around the laboratory can be used to stop leaks (figure 2).
Gastrointestinal organs:
Minimal fixation is important for maintaining shape of thinner walled hollow organs. Without such, the organ will collapse and often be distorted (figure 1).
Hollow organs need to be flushed, cleaned, dilated and then fixed in a dilated state. Dilation of hollow organs will increase the flexibility of that organ due to the thinner wall. Intestinal specimens may be opened to remove ingest and then sutured closed (Henry, 1990). If ostia are to remain patent, they must be held open using tubing or some cylindrical object (Janick, et al., 1996). Tubing works nicely be- cause it will allow the dilating fluid into the next chamber. Dilation pressure should be carefully regulated. Over dilation will likely distort the anatomical presentation of the tract with loss of interior architecture. A noted example is the loss of gastric mucosal folds, as well as, loss or distortion of the angular incisura of the minor curvature of the stomach and the cranial flexure of the duodenum. How- ever, overdilation will overcome rigor, make the wall thinner and allow more flexibility of the specimen.
Lungs:
Lungs need to be dilated intratracheally to expand and conform them into a desired configuration. Excess blood should be flushed by alternatively filling the trachea with tap water and then allowing it to flow retrograde from the trachea. Only gentle pressure should be used to prevent rupture of the lung tissue. It is important to fix lung in a dilated state.
Female reproductive tracts:
Female reproductive tracts of large animals should be dilated to provide some flexibility. Except for the mare, most uteri are very difficult to dilate, probably because of the high content of smooth muscle. Introducing the dilatory fluid may be difficult because of a tightly closed cervix. Penetration of the cervix can be facilitated by inserting an insemination pipette through the cervix. Dilatory fluid simply may be placed through the wall of the uterus using a large gauge (14) needle. The vagina should also be dilated. Dilation is aided by suspending the reproductive tract by the vulva and simply filling the vagina and vestibule with the fixative.
Joint capsules:
Intact joint capsules may be distended with water and then fixed with 20% formalin to aid in studying the internal anatomy of the joint and the extent of the joint space and capsule (Tiedemann, 1989). A principle that often applies to many specimens is to dilate the cavity with water first and then maintain that dilation with formalin injection.
Musculoskeletal specimens
Often specimens, especially musculoskeletal specimens, appear cluttered because too many items have been preserved. Plan the theme of the specimen and limit the focus of the specimen to fewer structures. It is beneficial to remove excess connective tissue and define muscle groups. Isolate and clear vessels and nerves of most loose connective tissue for best definition.
Osteology preparations
Osteology preparations or specimens with some bony portions should have holes drilled through their cortex and into the medulla to enhance defatting. This will help pre- vent sticky/greasy specimens years later which occurs if fat is retained. Holes may be carefully drilled in less noticeable places for esthetic purposes.
Color preservation
Color preservation is often a concern. Both fixation and dehydration bleach color from the specimen. Many things have been tried and reported to enhance color retention (Tiedemann, 1982; von Hagens, 1985; Holladay, 1989; Oostrom, 1987; Kessler, 1990). However, the inherent nature of fixation and dehydration maximizes color loss. Fortunately pink color may be added to the surface of the specimen in the last acetone bath using Biodur stain (von Hagens, 1985). However, only the surface is stained by this product. Therefore, it is desirable to cut windows in hollow organs before staining. In highly vascular organs, especially hearts and placentas (Tiedemann, 1982; von Hagens, 1985; Oostrom, 1987; Oostrom and von Hagens, 1988), epoxy may be injected into the vascular system. The epoxy will flow into the small arteries and capillaries producing a brilliantly colored but firm specimen. However, epoxy is brittle and will fracture if bent. Hence if a flexible specimen is desired another intravascular coloring agent (silicone, gelatin or latex) may be desirable.
Brain
Long term fixed brain slices may be stained with Astra blue, aldehyde fuchsin or Darrow red to highlight the gray matter even in faded long-term fixed brains (Ulfig, 1990). Whole or partial animal preparations which have been used to demonstrate histochemistry (localization of the enzyme acetylcholinesterase) may be plastinated for continued long-term study of these specimens (Feeback, et al., 1990). S10 brain slices may be produced by slicing well-fixed brains and then dehydrating, impregnating and curing these slices. However, these tend to warp or curl and often small pieces may be lost if they are not held firmly between grids. A better method is to impregnate a well-fixed brain. Saw slices after S10 impregnation and long term curing. This method enhances white/gray differentiation (Weiglein, 1995), pro- duces durable specimens and eliminates the possibility of lost pieces. To further protect these specimens, they can be embedded in epoxy using the flat chamber method (Weber and Henry, 1993). This process is in the experimental stages, but the initial results look favorable.
Dehydration
It may be beneficial to dilate the organ in freezing acetone as the initial exposure to acetone. This freezes the organ in a dilated state and assures maximal dilation of the organ later on in the plastination process. Use caution when the organ is nearly full of cold freezing acetone, the frozen organ will not expand further and acetone may spray from the organ when it is full.
Curing
It is important to cure hollow organs in a dilated state (figure la), otherwise they may be nearly worthless (figure 1b) or have diminished value. Controlled laboratory air is a convenient method to dilate impregnated specimens. First the air is allowed to flow through the impregnated organ for several days to blow the excess polymer from the lumen of the hollow organ. After polymer flow has essentially ceased, a small amount (5-10 ml) of the curing agent (S6) is placed in a flask which has an inlet and outlet. The flask is placed in line between the air source and the specimen. The air flow is adjusted to dilate the impregnated specimen to its desired size. Upon commencing the use of S6, the out flow of the air from the specimen should be limited so that a low volume of air is passing through the S6 such that it is volatilized as slow as possible but yet keep the specimen dilated. This simply exposes the impregnated silicone to that volume of S6 for the maximal period of time and conserves S6. The air is allowed to continue to pass through the system and organ to keep the organ dilated. More S6 can be added later in the day and on subsequent days as desired until the polymer is cured and the organ maintains its shape when air pressure is discontinued. Excess polymer must be wiped from the organ several times the first day or two to minimize accumulation of polymerized silicone on the surface of the organ. It is helpful to enclose the specimen (a plastic bag works) during curing with dilation.
Using many of the above principals and procedures will insure that a useful and beautiful specimen will result.
Baptista CAC, Conran PB: Plastination of the heart: Preparation for the study of the cardiac valves. J Int Soc Plastination 3: 3-7,1989. https://doi.org/10.56507/PEXL8984
Feeback DL, Holliman J, Papka R: Plastination of whole animal preparations following histochemistry: In situ localization of the enzyme acetylcholinesterase. J Int Soc Plastination 4: 28-32,1990.
https://doi.org/10.56507/ARNL6708
Grondin G, Olry R: Vascular patterns of plastinated human hands with special reference to abnormalities of the arterial palmar arches. J Int Soc Plastination 10:19-21, 1996.
https://doi.org/10.56507/SDTU3072
Henry RW: Plastination of an integral heart-lung specimen. J Int Soc Plastination 1(2): 20-24,1987.
https://doi.org/10.56507/KQKI2988
Henry RW: Preparing and plastinating veterinary anatomy and pathology specimens. J Int Soc Plastination 4: 8, 1990.
Holladay SD: Plastination of inflated hollow gastrointestinal organs from large animals. J Int Soc Plastination 3: 34- 37, 1989. https://doi.org/10.56507/UZSD4906
Janick L, DeNovo B, Henry RW: Plastinated canine gastrointestinal tracts used to facilitate teaching of en- doscopic technique and anatomy. Presented at The 8th International Conference on Plastination - University of Queensland, Brisbane, Australia. July 1996. J Int Soc Plastination 11:5,1996.
Kessler R: Fixation solutions for color preservation in plastination. Presented at The 5th International Conference on Plastination, Faculty of Medicine, University of Heidelberg, Germany July 1990. J Int Soc Plastination 4: 9, 1990.
Oostrom K: Plastination of the heart. J Int Soc Plastination 1(2): 12-19, 1987.
https://doi.org/10.56507/YWZL8112
Oostrom K, von Hagens G: Plastination of the human placenta. J Int Soc Plastination 2(1): 18-23,1988.
https://doi.org/10.56507/XGAI3820
Riepertinger A, Heuckendorf E: E20 color-injection and plastination of the brain. J Int Soc Plastination 7(1): 8- 12, 1993.
https://doi.org/10.56507/YHON8469
Tiedemann K: A silicone-impregnated knee joint as a natural model for arthroscopy. J Int Soc Plastination 2(1): 13-17,1988.
https://doi.org/10.56507/CACT1479
Tiedemann K, von Hagens G: The technique of heart plastination. Anat Rec 204: 295-299, 1982.
https://doi.org/10.1002/ar.1092040315
Ulfig N: Staining of human fetal and adult brain slices combined with subsequent plastination. J Int Soc Plastination 4: 33-38,1990.
https://doi.org/10.56507/THKE9781
von Hagens G: Heidelberg plastination folder: Collection of all technical leaflets for plastination. Anatomisches Institut 1, Universitat Heidelberg, Heidelberg, Germany, 1985.
von Hagens G, Tiedemann K, Kriz W: The current potential of plastination. Anat Embryol 175: 411-421,1987.
https://doi.org/10.1007/BF00309677
Weber W, Henry RW: Sheet Plastination of Body Slices - E12 Technique, Filling Method. J Int Soc Plastination 7: 16-22, 1993.
https://doi.org/10.56507/EZGX2343
Weiglein A: Plastination of brain slices. Presented at The 8th International Conference on Plastination - University of Queensland, Brisbane, Australia. July 1996. J Int Soc Plastination 11: 34, 1996.