- Original Article
- Open access
- Published:
Simulation and Experimental Study on a New Successive Forming Process for Large Modulus Gears
Chinese Journal of Mechanical Engineering volume 34, Article number: 127 (2021)
Abstract
A successive tooth forming process for producing large modulus spur gears (m>2.5 mm) is firstly proposed in this paper to break the restrictions of large forming load and large equipment structure of traditional plastic forming. It contains the preforming stage and the finishing stage. In the first stage, the die with a single-tooth preforms gear teeth one by one through several passes. In the second stage, the other die with multi-teeth refines the preformed teeth into required shape. The influence of total pressing depth and feed distribution in preforming stage on final forming quality is analyzed by numerical simulation, and the reasonable process parameters are presented. Successive tooth forming experiments are carried out on the self-designed gear forming device to verify the optimal simulation results. Gears without fold defects are well formed both in simulations and experiments, proving the feasibility of this method. Compared with the whole die forging process, the new technology has advantages of smaller load and simpler tooling, which shows a good potential for manufacturing large modulus and large size spur gears.
1 Introduction
Gears are widely used in the transmission of mechanical devices due to their superiorities of high efficiency, compact structure and stability. Modulus of a gear indicate the size of gear teeth. Generally, a gear with the modulus larger than 2.5 mm is called a large modulus gear [1], which is difficult to manufacture for its large dimensions. As one of the primary manufacturing method for large modulus gears, cutting process has weaknesses of low material utilization rate, discontinuous material fiber and poor mechanical properties. Gear shaving is a high-efficiency process in gear manufacturing, but the concave error of tooth profile is difficult to eliminate and has been one of the main factors causing vibration and noise of the gear transmission [2]. Gears produced by sintering process have good dimensional accuracy and surface roughness [3]. But sintering has inherent technical limitations of lower density of sintered gears especially the large gears, which seriously affects the mechanical properties of gears such as strength and hardness. Advanced plastic forming methods, such as precision forging and extrusion forming, are capable of achieving high production efficiency as well as good mechanical properties of products with complete material fiber [4]. However, the large forming load in plastic forming brings lots of unavoidable problems, including the difficulty of mold unloading, the insufficient filling of teeth corner, the short service life of dies and so on.
Researches on reducing forming load in precision forging have been carried out for many years, the main methods are divided flow and floating die process [5]. Kondo and Ohga [6] applied the process of dividing material flow to produce ring gears, and it was proved to be accuracy and efficiently. Ohga et al. [7] examined the optimum process parameters combination of a two-step precision forging method to enlarge the possibility of applying the process utilizing divided flow with intention of reducing the contact pressure. Relief-cavities with different sizes on the top of die teeth were used in hot precision forging to promote metal filling [8]. For the same purpose of reducing the difficulty of material filling in gear teeth, Tan et al. [9, 10] put forward an improved scheme combined with floating die structure based on the theory of restrained divided-flow, which could ensure the reduction of forming load and form standard gear teeth.
Gear rolling is characterized by partial loading and local deformation and thus it has advantages of low forming force, high material utilization and good surface strength of formed-gears. At present, cold rolling process is only appropriate for small modulus tooth-shaped gears or splines on account of the work hardening of metals [11]. Wang et al. [12] studied the problems of non-uniformity teeth graduation in initial forming stage and formation of rabbit ears in later forming stage. Afterwards, Li et al. [13, 14] investigated the main influence factors affecting slippage problem and analyzed the formation mechanism of rabbit ear, which provided a scientific basis to further explore of controlling rabbit ear defects. Then, a gear rolling process using conical gear rollers was proposed, in which the axial feed applied on the blank replaced the radial feed applied on the roller, achieving more uniform tooth graduation and refining [15]. Landgrebe et al. [16] employed a cross-rolling process featured by round tools with outer gearings to achieve hot rolling of large spur gears and mathematically analyzed the forming load and momentum to determine the required forces and torques.
Merklein et al. [17] presented a new approach for the direct forming starting from blanks named “Sheet-Bulk Metal Forming (SBMF)”. The material flow which concern the geometric accuracy and the filling in SBMF was improved by a local increase of friction as well as the process adapted blanks [18]. Sieczkarek et al. [19] characterized the plastic flow and proposed a closed-form analytical framework to estimate the through-thickness pressure and force in sheet-bulk indentation. An incremental gear forming process by means of double-wedge gear tooth punch was provided by Sieczkarek et al [20]. Then, his group analyzed the differences between incipient and repeatable material flow in incremental SBMF of gears, and investigated three influencing factors aiming for a formfilling progress of the first tooth element and an improvement of the teeth heights [21, 22].
The existing cold rolling and no-flash precision forging process are limited by plastic deformation and forming load restrictions in the manufacture of large modulus spur gears. Strong strain hardening during cold working also hinders the application of SBMF. In comparison, these problems can be effectively solved by hot-working and partial-molding methods. Thus, a successive tooth forming process is proposed based on the hot rolling and SBMF, which can form gears by a certain number of rational-pressing passes in the heated state. This process has superiorities of small forming load, high material utilization, simple tooling set and good mechanical properties such as bending fatigue strength of formed gears, showing a good potential in fabricating large modulus spur gears, especially for those with large axial dimensions.
In this paper, finite element method (FEM) is employed to study the influences of total pressing depth and distribution of per-pass feed in the preforming stage on final forming quality. The forming parameters are explored by numerical simulations, and experiments are conducted to verify the feasibility of this newly proposed forming process for large modulus gears.
2 Method
2.1 Principle of the Successive Tooth Forming Process
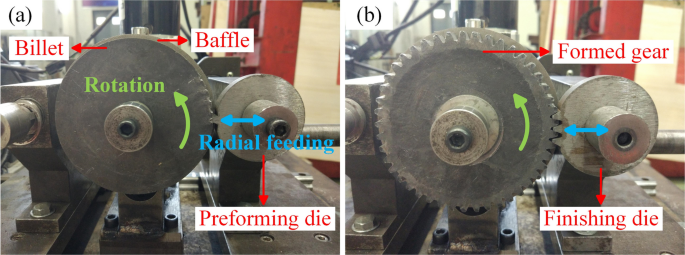
The successive tooth forming process includes preforming stage and finishing stage using two different dies, as shown in Figure 1. The preforming die is designed to be a single-tooth structure of which the profile is in accord with the tooth space of the formed gear. The finishing die is similar to the preforming one, but the single-tooth is replaced by the multi-tooth structure. In the preforming stage, the die firstly presses a certain depth into the billet along radial direction and then returns to the initial position. Secondly, after the billet rotates an angle of 360°/z (z is the teeth number of to-be-formed gear), the die repeats the aforementioned pressing process. The gear teeth will be formed successively through the multi-pass pressing mode. Finally, in the finishing stage, the die with multi-tooth structure is employed to finish the tooth profile following the same procedure. Compared with the double-wedge gear tooth punch designed by Sieczkarek et al. [20], the single-tooth preforming die imposes less constraints on the deformation area. At the same time, however, the forming accuracy of single-tooth die is lower than the double-wedge one, requiring multiple passes to be corrected.
2.2 Numerical Modelling
The successive tooth forming process is numerical simulated by means of Deform-2D software. Effects of the pressing depth and the distribution ratio of per-pass feed on the final forming quality are analyzed. Without considering the axial flow of materials, the deformation process is simplified as a two-dimensional problem with plane strain and calculated by the sparse solver in all simulations.
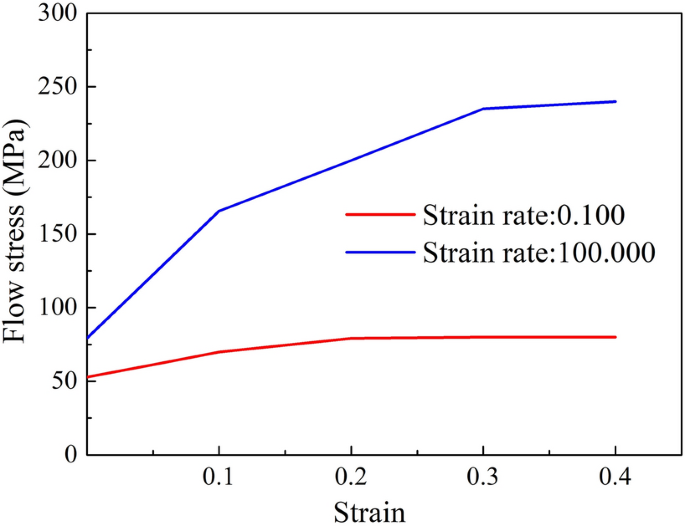
Table 1 shows the parameters of the objective gear in numerical simulations. The 45# steel having good plasticity and formability is chosen as billet material and its corresponding brand in Deform-2D is AISI-1045 (900‒1200℃). Its constitutive model is shown in Figure 2. The initial billet temperature is set to 1100 °C, a typical hot forming temperature for steel materials. The forming is an isothermal process so the heat transfer consistent is 0 at all interfaces. Friction coefficient between the billet and dies is 0.3 in the shear friction model since this process is in the category of hot forging.
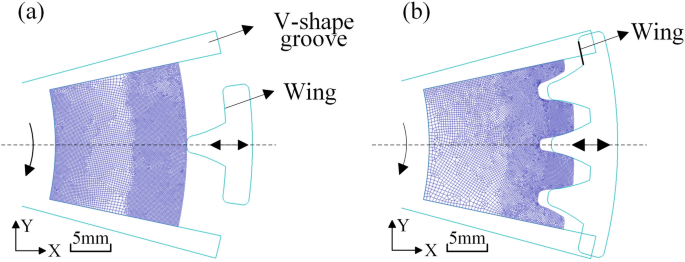
According to the constant-volume principle, the diameter of the cylindrical billet is calculated to be 134.58 mm, but it is finally designed to be 135 mm which is exactly equals to the pitch diameter of the objective gear considering leaving a certain working allowance. The billet is designed to a circular ring shape since the deformation occurs only in the outer part. In addition, due to the symmetry of billet geometry and deformation, 1/15 of the billet (a region including three teeth) is selected as the model to further improve the simulation efficiency. Thus the axis symmetry boundary of the billet is set to a symmetry constraint. The billet is divided into 10055 relative elements, and the elements of the outer part are partially refined in proportion to 3:1. In order to further simplify the simulation constraints, a frictionless V-shape groove is employed to limit the undesirable material flow on the inner circle and symmetric sides of the billet. Meanwhile, the groove drives the billet to rotate together. The inner circle of the billet is fixed in both X and Y direction.
To obtain the tooth profile of the preforming and finishing dies, Boolean cutting operations from the formed gear are conducted in CAD software. Two wing structures are designed on both dies to limit the excessive flow of materials. The radial feeding velocity of the dies is selected as 6 mm/s [23]. Figure 3 shows the established FEM simulation model.
3 Results and Discussion
3.1 Influence of Total Pressing Depth of Preforming on Forming Quality
In the preforming stage, the total pressing depth of the preforming die has important impact on the quality of subsequent finishing stage. Theoretically, the total pressing depth should be 1.25 times of the objective gear's modulus m. But considering the deformation allowance for finishing stage, the preforming depths are set as 1.35, 1.25, 1.15 times of the modulus m (marked as Scheme 1-1, 1-2 and 1-3) to find out the optimal procedure. Since the modulus m is 3 mm in this study, the preforming depths are 4.05 mm, 3.75 mm, 3.45 mm respectively. The preforming stage of each condition is equally divided into 10 passes, and there is no fold in any pass.
Figure 4(a)‒(c) shows the partial enlarged teeth during the finishing stage in Scheme 1-1. It can be seen that the shapes of the two teeth tend to be complete. However, the root area has not been fully filled and generates severe fold with the thickness of 0.22 mm. It is recognized that thickness can be the measurement index of fold [24]. The fold defect leads to the degradation of dimensional accuracy and surface quality, even causes cracking in the root area as a potential crack source. The generation of fold defects is analyzed as follows. The addendum is formed to standard shape earlier than the dedendum in finishing stage because of the overlong teeth as a result of the large preforming pressing depth. The material on both sides of the overlong teeth is seriously squeezed by the finishing die and accumulates towards the root, leading to a severe confluence fold.
Figure 4(d)‒(f) shows the partial enlarged teeth during the finishing stage in Scheme 1-2. It can be seen that both addendum and dedendum areas are nearly simultaneously filled, but the confluence fold at dedendum still exists for the same reason as that of Scheme 1-1. However, the fold in Figure 4(f) is very thin with a thickness of 0.03 mm. It can be ignored in view of the reserved working allowance of the billet.
Figure 4(g)‒(i) shows the partial enlarged teeth during the finishing stage in Scheme 1-3. It is evident that both sides of the tooth are less squeezed by the finishing die, the accumulation towards root direction is slight and no fold appears in the whole finishing process.
The simulation results reveal that the preforming pressing depth should between 1.15 to 1.25 times of the modulus m, and finally it is set to 1.20m for reserving a rational deformation allowance for the finishing stage.
3.2 Influence of the Per-pass Forming Depth on the Final Quality
In the preforming stage, the deformation process is divided into several feeding passes. The forming depth in each pass has significant influence on the final forming quality and efficiency.
Based on the simulation results in Section 3.1, the preforming pressing depth is set as 3.60 mm (1.20 times of the modulus m). Since the total feed is fixed, the per-pass feed is related to the number of passes. A large feed may cause the two adjacent teeth to interfere with each other and be more likely to generate fold defects. Thus, the feed amount in each pass has an upper limit. The influence of the feed distribution on forming quality and efficiency are analyzed in two different distribution ways.
3.2.1 The Uniform Forming Depth in Per-pass
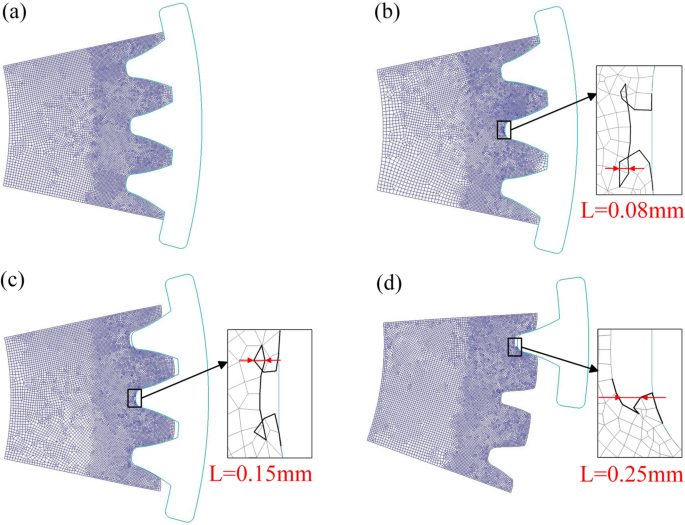
The total preforming feed value is equally divided into 6, 5, 4, and 3 passes (marked as Scheme 2-1, 2-2, 2-3 and 2-4). The per-pass feed is 0.60 mm, 0.72 mm, 0.90 mm and 1.20 mm, respectively. Corresponding simulation results are shown in Figure 5. It is found from Figure 5 that the less the number of passes is, the severer the fold defects are. No fold defect occurs under the condition of 6 passes. When the number of passes is 5 or 4, the fold defects only appear in the finishing stage. And when there are 3 passes, the fold defects generate as early as the third pass of preforming stage. The size of folds are marked in Figure 5. In summary, the folding defects is more likely to occur in the later period during the whole forming process.
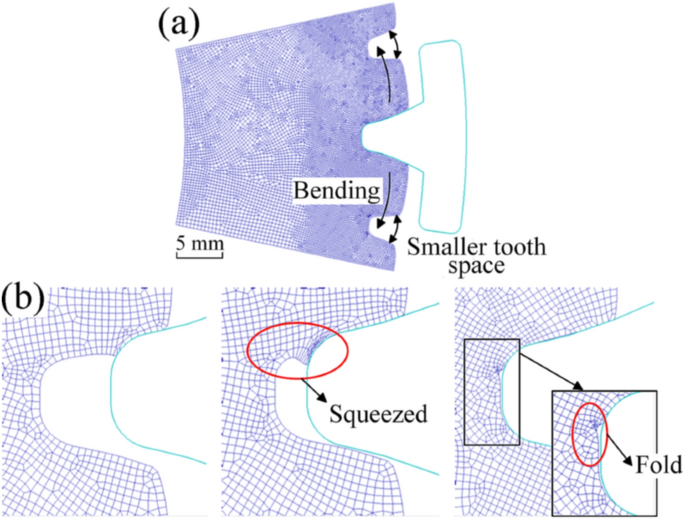
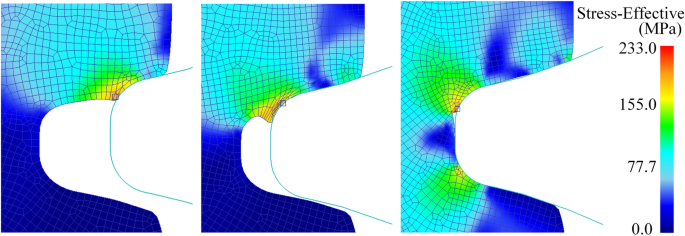
The generating mechanism of folding is similar. Taking Scheme 2-4 as an example, it demonstrates the formation of fold in its third pass in Figure 6. A large feed leads to the inward bending of two adjacent teeth. Therefore, the tooth space become smaller, as can be seen from Figure 6(a). When the preforming die presses into the smaller tooth space at the next pass, the materials on the side of the bended teeth are squeezed into the dedendum. These materials accumulate in the dedendum and form fold defects, as shown in Figure 6(b). Figure 7 shows the equivalent stress distribution corresponding to each step in Figure 6(b). It can be seen that with the feed of preforming die, a serious stress concentration occurs along with the fold. Stress concentration can easily lead to crack and failure of parts, which should be avoided as much as possible in processing.
Equivalent stress distribution of corresponding steps in Figure 6(b)
When the feed in each pass is small, the deformation process is similar to the traditional gear rolling. Although tooth bending and fold defect can be avoided, the forming efficiency is too low. Therefore, it is not appropriate to adopt the uniform forming depth method in the preforming stage.
3.2.2 The Degressive Distribution of the Feed
When the per-pass feed is evenly distributed, it requires at least 6 passes to obtain a gear with an accurate shape. In Scheme 2-3, no fold generates in preforming stage while severe fold appears in finishing stage resulting from the too large feed in the last preforming pass. Thus it is better to decrease the feed amount in the later passes while increase it in the initial passes, that is, the feed distribution should follow a degressive rule.
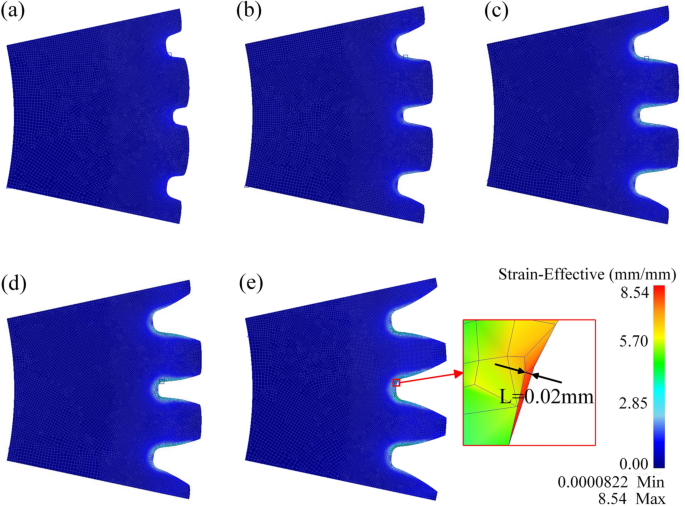
Four different feed distribution schemes following the degressive rule are designed and simulated to find out the optimal distribution method, as listed in Table 2. The last pass should have a small feed for reducing the tilt of gear teeth, which is beneficial to the final forming quality. Among the four schemes, Scheme 3-2 has the best forming results while others all have different degree of fold defects. Teeth shapes and equivalent strain distributions of each preforming pass and finishing stage in Scheme 3-2 are shown in Figure 8. It is worth noting that teeth are formed in a clockwise sequence beginning with the intermediate dedendum, the upper dedendum is eventually formed in every pass and causes the intermediate dedendum to be squeezed and narrowed. The strain of formed teeth in preforming stage is very low. The thickness of the high strain area appeared in last step of finishing stage is only 0.02 mm and can be completely removed during the following machining process, which is necessary to ensure the dimensional accuracy and surface quality of parts.
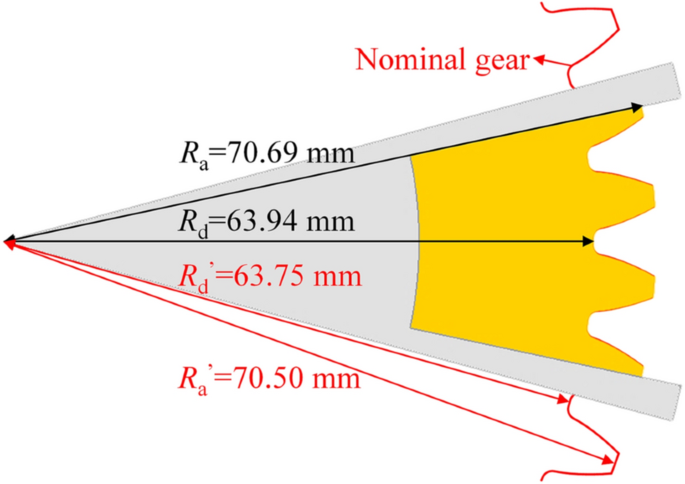
The formed gear in Scheme 3-2 and the standard nominal gear are compared in Figure 9. The simulated gear is fully filled and its profile basically coincides with the nominal one. Generally, parts after hot forming will shrink when cooled to room temperature. For large modulus gears, it is necessary to leave a machining allowance for the formed gear in actual production, and the final accuracy is guaranteed by machining. In Figure 9, it is worth noting that both the addendum circle radius Ra and dedendum circle radius Rd of the simulated gear are slightly larger than the standard value (Ra’ and Rd’). The extra material is just the reserved machining allowance and shrinkage allowance, and will be removed in the later machining process to obtain the accurate tooth profile.
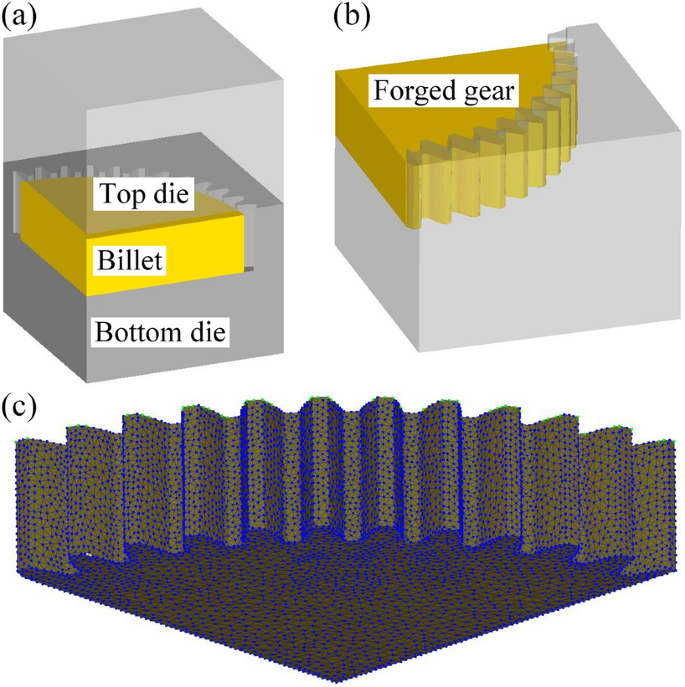
To compare the forming quality and load of the proposed method with the traditional integral die forging, a set of quarter closed-die forging FEM-3D model is designed to carry out integral forming. The parameters of objective gears and the simulation conditions are the same as those stated in Section 2.2, except that the thickness of object gear here is 20 mm. Figure 10 shows the FEM model and the forged gear.
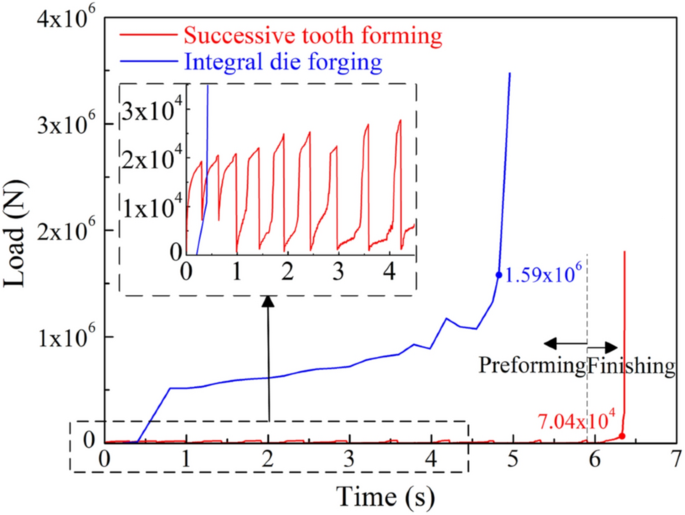
It can be found from Figure 10 that the gear teeth are well formed, but the deformation force for closed-die forging is very high. In Deform-2D, the default thickness of the plane model is 1 mm. So the 2D simulated load value of Scheme 3-2 is multiplied by 20, and then compared with the load of integral die forging in Figure 11. Both two curves have inflection points where the materials begin to fill the corner of dies in the final stage of forming. Two inflection point values differ by about 22 times. It is obvious that the load of successive tooth forming is much lower than that of the integral die forging.
The above simulation results and analysis proves that gears can be precisely formed without defect by merely 4 passes in degressive rule, and the forming efficiency is improved obviously comparing with the uniform distribution way. In addition, the newly proposed method is much better than traditional integral die forging in terms of deformation load.
4 Experimental Verifications
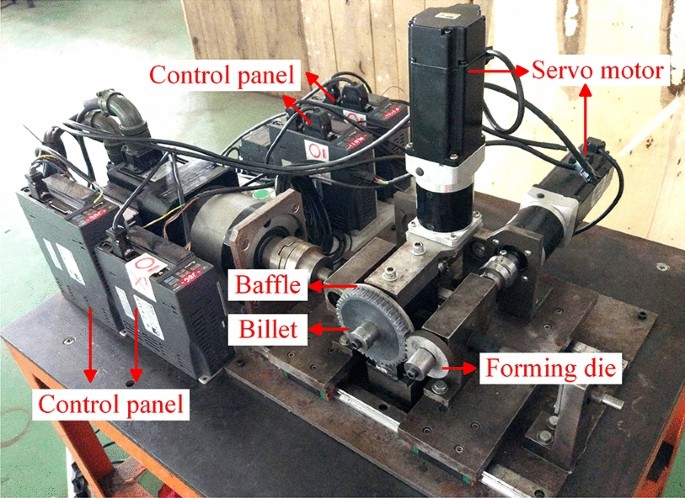
Successive tooth forming experiments are carried out on the self-designed gear forming device shown in Figure 12 to verify the optimal simulation results. Name of each major part of the device is marked in Figure 12. Figure 13 shows the experimental process of preforming stage and finishing stage. The rotation of the billet and the radial feeding of dies (shown in Figure 13) are driven by two independent servo motors respectively. The rotation and feeding speed are adjusted on the control panels. Due to the limitation of the experimental equipment and conditions, lead is selected as the billet material instead of steel AISI-1045. The flow behavior of lead in room temperature is similar to that of the steel in the stage of hot forming. The parameters of the objective gear are consistent with those in simulations. In order to prevent the billet material from flowing along the axial direction, two baffles are applied out of both end faces of the billet. In Figures 12 and 13, the outer baffle is temporarily removed in order to visually display the billet. According to the optimal simulation results of Scheme 3-2, the same process parameters are used in the experiment. The detailed procedure is listed in Table 3.
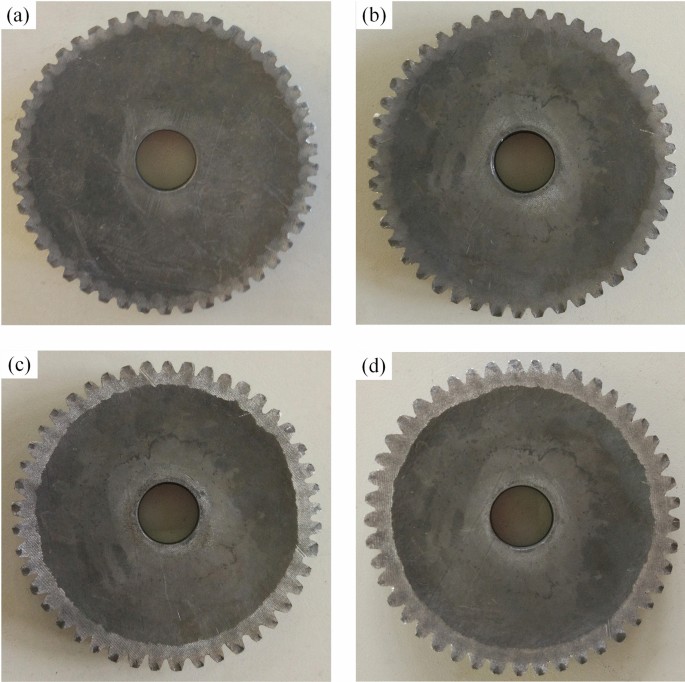
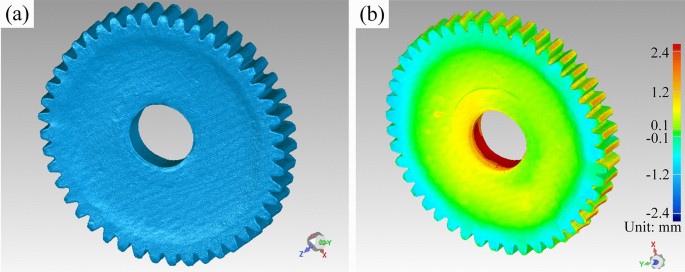
The samples after each pass in preforming stage are shown in Figure 14, while the 3D solid model of the finally formed gear is shown in Figure 15(a). The solid model is acquired by encapsulating the point cloud data obtained by scanning the sample using 3D laser scanner EinScan-pro. The sample and a standard gear are put into the Geomagic Qualify 2013 software for analysis, and the dimensional deviation nephogram of the sample is shown in Figure 15(b). A positive value in the scale represents that the size is smaller than the standard value. The teeth are evenly distributed basically. As measured by Geomagic Studio software, the addendum circle diameter is 138.64 mm, smaller than the standard value of 141.00 mm, and the axial thickness of the edge areas is 1.26 mm thicker than the standard value of 13.50 mm. This is because the baffles used in experiments are not strong enough to prevent the widening of end faces due to restrictions of experimental condition. The strength of baffles needs improving to obtain gears with precise dimensions.
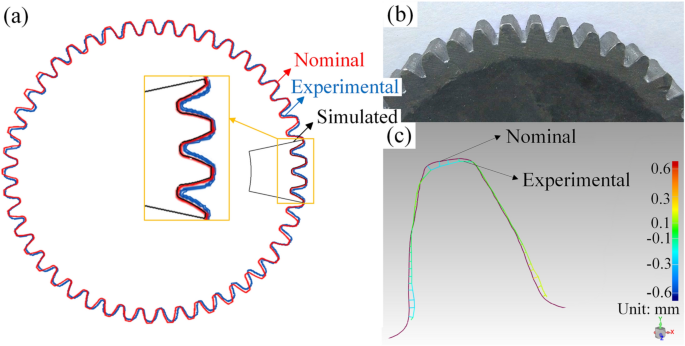
Figure 16 shows the integral and detailed tooth profile of the sample obtained from simulations and experiments. The experimental gear profile and its dimensional deviation with a standard tooth are obtained from the 3D solid model. Average tooth height and average tooth width of the sample are 6.63 mm and 4.70 mm, smaller than the standard value of 6.75 mm and 4.71 mm, respectively. The addendum is not completely filled on account of that the material flows along the axial direction and produces end faces widening or flashing. This phenomenon can be avoided in actual production by strengthening the baffles to prevent end face widening, deepening the groove areas of the finishing die to insure the full filling of addendums with a reasonable working allowance. The tooth is slightly tilted, which is caused by the uneven tooth graduation as a result of the equipment’s insufficient precision. Nonetheless, the accuracy of the tooth graduation can be easily improved by Programmable Logic Controller (PLC) system or other methods in the industrial manufacture.
Figure 17 shows the verification result of fold caused by unreasonable preforming feed distribution. Take the above Scheme 2-4 as an example. Only four consecutive teeth are formed to represent the whole gear for simplifying the experiments. A large folding defect resulting from the accumulation of side materials can be observed, which is in good agreement with the simulation results shown in Figure 6.
In summary, although the successive forming model has not been verified using steel samples, the current experimental results are in good consistent with those in simulations. The proposed successive tooth forming process for large modulus spur gears is basically feasible and has potential application prospect in the future.
5 Conclusions
A successive tooth forming process for manufacturing large modulus spur gears is proposed in this paper. Different total preforming pressing depths are designed and their effects on the final forming quality are analyzed by FEM. Successive tooth forming experiments are carried out using lead samples. Based on the FEM and experiential results, the following conclusions can be reached:
-
(1)
The whole forming process is divided into preforming and finishing stages, and the preforming stage includes several cyclic passes. Different dies are designed severally according to their functions in this process.
-
(2)
It is found from the numerical simulations that the reasonable value of preforming pressing depth is 1.20 times of the objective gear’s modulus m. Feed distribution in the preforming stage should follow the degressive rule. The optimal feed distribution scheme is presented, that is 50%, 30%, 15% and 5% of the total preforming pressing depth in turn.
-
(3)
Integrated gear profile and teeth shape without fold defect can be formed experimentally by adopting the optimal scheme obtained in FEM. The experiment results are consistent with that of the simulations, showing the feasibility and potential practicality of the successive tooth forming process for large modulus spur gears.
References
H Jiang. Research on automatic ultrasonic testing technology for gears with middling and small modulus. Taiyuan: North University of China, 2007.
A J Cai, L Liu, L Li, et al. Analysis on contact characteristic and mechanism of concave‒errors caused by shaving. Journal of Vibration and Shock, 2018, 37(8): 68‒86.
B Yang, J Cho, L P Xin, et al. Flash sintering of additively manufactured 3YSZ gears. Journal of the American Ceramic Society, 2021, 104(8): 3828‒3832.
J Xia, L Deng, J Jin, et al. Current situation and development trend of precision forging technology in China. Forging & Stamping Technology, 2019, 44 (6): 1‒16, 29.
D J Politis, N J Politis, J Lin, et al. A review of force reduction methods in precision forging axisymmetric shapes. The International Journal of Advanced Manufacturing Technology, 2018, 97(5): 2809‒2833.
K Kondo, K Ohga. Precision cold die forging of a ring gear by divided flow method. International Journal of Machine Tools & Manufacture, 1995, 35(8): 1105‒1113.
K Ohga, K Kondo, T Jitsunari. Research on precision die forging utilizing divided flow: third report, study on an optimum combination by 'two step method' proposed anew. Bulletin of the JSME‒Japan Society of Mechanical Engineers, 2008, 25(209): 1843‒1850.
B Zuo, B Y Wang, Z Li, et al. Design of relief-cavity in closed-precision forging of gears. Journal of Central South University, 2015, 22(4): 1287‒1297.
X F Tan, X Liu, D F Hu, et al. Spur gear restrained distributary precision forging. Forging and Stamping Technology, 2010, 35(2): 26‒30.
X F Tan, B H Xie, X Liu. Experiment and numerical simulationon precision forging for spur gear based on floating die and restrained split-flow. Journal of Plasticity Engineering, 2016, 23(1): 7‒10.
G C Wang, J Li, T Wu, et al. Gear rolling technology and its research progress. Aeronautical Manufacturing Technology, 2016, 17: 36‒40.
G C Wang, J Li, T Wu. Numerical simulation and experimental investigation on the gear rolling process. Procedia Engineering, 2017, 207: 609‒614.
J Li, G C Wang, T Wu. Numerical simulation and experimental study of slippage in gear rolling. Journal of Materials Processing Technology, 2016, 234: 280‒289.
J Li, G C Wang, T Wu. Numerical-experimental investigation on the rabbit ear formation mechanism in gear rolling. International Journal of Advanced Manufacturing Technology, 2017, 91(9‒12): 3551‒3559.
T Wu, G C Wang, J Li, et al. Investigation on gear rolling process using conical gear rollers and design method of the conical gear roller. Journal of Materials Processing Technology, 2018, 259: 141‒149.
D Landgrebe, A Sterzing, M Lahl, et al. Hot forming of large spur gears. Procedia Engineering, 2017, 207: 615‒620.
M Merklein, J Koch, T Schneider, et al. Manufacturing of complex functional components with variants by using a new metal forming process-sheet-bulk metal forming. International Journal of Material Forming, 2010, 3(Suppl. 1): 347‒350.
M Merklein, J Koch, S Opel, et al. Fundamental investigations on the material flow at combined sheet and bulk metal forming processes. CIRP Annals-Manufacturing Technology, 2011, 60(1): 283‒286.
P Sieczkarek, K Isik, N Ben Khalifa, et al. Mechanics of sheet-bulk indentation. Journal of Materials Processing Technology, 2014, 214(11): 2387‒2394.
P Sieczkarek, S Wernicke, C Weddeling, et al. Local forming of gears by indentation of sheets. Proceedings of the Institution of Mechanical Engineers Part B-Journal of Engineering Manufacture, 2016, 232(5): 1‒10.
P Sieczkarek, S Wernicke, S Gies, et al. Incipient and repeatable plastic flow in incremental sheet-bulk forming of gears. International Journal of Advanced Manufacturing Technology, 2016, 86(9‒12): 3091‒3100.
P Sieczkarek, S Wernicke, S Gies, et al. Improvement strategies for the formfilling in incremental gear forming processes. Production Engineering, 2017, 11(6): 623‒631.
G H Liu, X Wang, H R Lin, et al. Parameter optimization design for hot die forging process of driven spiral bevel gear blank. Machinery Design and Manufacture, 2017, 3: 250‒253.
Y Liu, Y Wu, J Wang, et al. Defect analysis and design optimization on the hot forging of automotive balance shaft based on 3D and 2D simulations. The International Journal of Advanced Manufacturing Technology, 2018, 94:2739‒2749.
Acknowledgements
Not applicable.
Funding
Supported by National Natural Science Foundation of China (Grant No. 51475271).
Author information
Authors and Affiliations
Contributions
GW was in charge of the whole trial; YL conceived the idea, completed most of the research work and wrote the manuscript; TW guided the verification experiments. All authors read and approved the final manuscript.
Authors’ Information
Yao Lin, born in 1994, is currently a PhD candidate at Laboratory for Liquid-Solid Structural Evolution and Processing of Materials, Ministry of Education, Shandong University, China. She received her bachelor degree from Beijing Institute of Technology, China, in 2016. Her research interests include metal plastic forming and grain boundary modification.
Tao Wu, born in 1984, is currently a PhD candidate at Laboratory for Liquid-Solid Structural Evolution and Processing of Materials, Ministry of Education, Shandong University, China. He is working in the area of plastic forming manufacturing and additive manufacturing.
Guangchun Wang, born in 1966, is currently a professor and a PhD candidate supervisor at Shandong University, China. His main research interests include metal plastic forming, precision forging, additive manufacturing and microforming.
Corresponding author
Ethics declarations
Competing Interests
The authors declare no competing financial interests.
Rights and permissions
Open Access This article is licensed under a Creative Commons Attribution 4.0 International License, which permits use, sharing, adaptation, distribution and reproduction in any medium or format, as long as you give appropriate credit to the original author(s) and the source, provide a link to the Creative Commons licence, and indicate if changes were made. The images or other third party material in this article are included in the article's Creative Commons licence, unless indicated otherwise in a credit line to the material. If material is not included in the article's Creative Commons licence and your intended use is not permitted by statutory regulation or exceeds the permitted use, you will need to obtain permission directly from the copyright holder. To view a copy of this licence, visit http://creativecommons.org/licenses/by/4.0/.
About this article
Cite this article
Lin, Y., Wu, T. & Wang, G. Simulation and Experimental Study on a New Successive Forming Process for Large Modulus Gears. Chin. J. Mech. Eng. 34, 127 (2021). https://doi.org/10.1186/s10033-021-00653-5
Received:
Revised:
Accepted:
Published:
DOI: https://doi.org/10.1186/s10033-021-00653-5

